 Skip to content


Plot, Plan, and Design
1. The first step in designing a residential system is to measure the property and indicate the location of the house. On a separate piece of paper, sketch out your property and place your measurements on the sketch. Be sure to include all concrete or brick walks and patios, driveways, and fences. While you are measuring, locate any trees, shrubs, and lawns and draw them on the sketch.
2. Next, draw the plot plan to scale on a graph paper. The scale can be 1:100, 1:200, or whatever you decide. Write your scale on the plan. Make sure to note lawn, shrub, ground cover, and large trees.
3. On the plot plan, divide the property into areas. Consider the information in Step 2 while dividing up the plot plan: front yard, back yard, side yard, lawn or shrub areas, and shady areas. Label your areas A, B, C. (See below for an example)


Determine System Design Capacity
When planning an efficient automatic irrigation system, you must first determine the correct Sprinkler System Design Capacity—how much water is available for residential irrigation. If the system will be installed using city water, follow the steps below. If the water will be drawn from a lake or well, your Hunter dealer or the pump installer will have the specifications for pressure and volume.
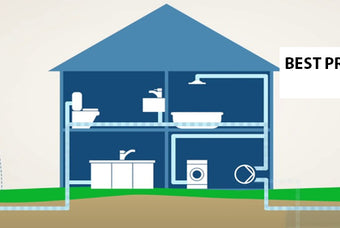
1. Water pressure (bar; kPa) To check the water pressure, attach a pressure gauge to the outside faucet closest to the water meter Figure 1. Make sure that no other water is flowing at the residence. Turn on the faucet and record the number on the first line in the right hand column below. This is the static water pressure in bar; kPa.
2. Water volume (l/min) To determine the volume of water available for the system, you need two pieces of information:
A. What size is the water meter? The water meter will generally have the size stamped on the meter body. The most common sizes for residential meters are 15 mm, 20 mm, and 25 mm. In some areas, the water is connected directly to the city main without the use of the water meter. In these cases, simply enter the size of the service line in the space provided.
B. What size is the service line? Measure the outside circumference of the pipe that runs from the city main to the house. An easy way to do that is to wrap a piece of string around the pipe, measure the string, and use the table to the right to convert the string length to pipe size
Select Sprinkler Heads
There are three basic types of sprinklers for residential use: large area rotors, rotating stream spray sprinklers, and small area fixed spray sprinklers. Large area rotors and rotating stream spray sprinklers should never be installed on the same zone as small area fixed spray sprinklers. Highefficiency spray nozzles such as MP Rotators® with PRS40 pressure-regulated bodies should be considered in place of traditional fixed nozzles.
1. Large area rotors will cover areas that measure 8 m by 8 m and larger.
2. Small area rotating stream or spray sprinklers are typically used in areas smaller than 8 m by 8 m.
3. Micro irrigation delivers water right at the base of the plant through a system of flexible irrigation tubing, drip emitters, and micro sprays.
Within these groups are pop-up sprinklers, which are installed even with the grade, and riser-mounted shrub heads, which are installed above grade. This 8 m by 8 m measurement is not a rule; rather, it is a guideline. The only consideration restricting the size of the area in which spray heads (small area sprinklers) can be used is economics. If a large area rotor can be used, it usually means less pipe, fewer valves, and a smaller controller will be required to complete the job.

Draw Sprinkler Head Locations
Decide where you will be installing large area sprinklers and where you will be installing small area sprinklers. Large area sprinklers should be 8 to 12 m apart. Small area sprinklers should be 3 to 5 m apart. This spacing will allow spray patterns to overlap and assure even water distribution. Do not mix sprinkler types within one area. Do not place sprinkler heads too far apart; stay within specifications listed on the Sprinkler Performance Charts, which can be found in the Hunter Product Catalogue. Spacing is determined by the size of the area the sprinkler is serving. Additionally, a sprinkler should be spaced so that it will spray both the head next to it and the head across from it. Working with one area at a time, start placing sprinkler heads:

Divide Sprinklers into Zones
Unless you have a very small yard, you probably do not have enough water capacity to irrigate the entire yard at once. Many areas will require more water than the residence has available (system design capacity). Consider the dividing lines based on sun exposure and plant type/watering needs to control the amount of water applied in each area or hydro-zone.

Indicate Zones
You will need to section the yard into “zones”. Dividing the area into zones is an easy process. Beginning with area A:
1. Refer back to the working pressure entered on page 4. This is the pressure you will need to use when determining sprinkler spacing and l/min requirements listed in the Sprinkler Performance Charts.
2. Write the individual sprinkler’s l/min next to each sprinkler head in the area. Use the Sprinkler Performance Charts in the Hunter Product Catalogue.
3. Add up all of those numbers and divide the sum by the total l/min (system design capacity) available.
4. If the total number of zones is not a whole number, round the number up to establish how many zones there will be (1.2 zones becomes 2 zones). This is the total number of valves needed for the sprinklers in that area or hydro-zone.
5. Now that you know how many zones the area will have, divide up the sprinklers so that each zone in the area will have approximately the same l/min. Do not place too many heads on the same zone; stay within the system’s design capacity.
6. Draw and label the zone valves for this area (i.e., Zone 1, Zone 2, etc. — as seen on page 10). 7. Draw sprinkler head locations and divide sprinklers into zones for all areas
Installing Sprinkler Heads
1. Install all the heads but the last head on a run. Leave the last one(s) off for proper flushing.
2. Flushing System: Turn on the zone manually at the valve. Allow the water to flush out any dirt which may have entered the system. Flush the system even if you are sure nothing got in during installation. When you are certain that the water is clean, turn the zone valve off and install the remaining heads.
3. Checking for Proper Coverage: Turn the zone on at the controller. By activating the controller, you are making sure that the wire and wire connectors are operating properly. Adjust the sprinklers and check for coverage.
Backfilling
1. Do not directly bury the valves. Install a valve box for easy access to valves. Wait until you are backfilling the trench to set the valve box.
2. Make sure there are no rocks directly next to the pipe. Backfill one-third to one-half of the depth of the trench at a time, compacting the dirt as you go. Make sure to allow space for the extra dirt on the sod when setting the sprinkler heads and valve boxes.

